Wednesday, June 16, 2010

PuzzLego: Chinese Cross small

A few weeks ago I purchased some wooden puzzles from Goodwill. However, as things often are at Goodwill, not all of the parts were in the box. Looking at the instructions, I had the idea of trying to make Lego versions of the puzzles. I decided to start with the simplest. Looking online, this is the Chinese Cross.


Picture of the box and the four puzzles.


The three pieces that I had for the Chinese Cross puzzle.


Lego prototype to see if it was possible. Each piece is 5 plates high, 2 studs wide, and 10 studs long.


The six pieces in the prototype.


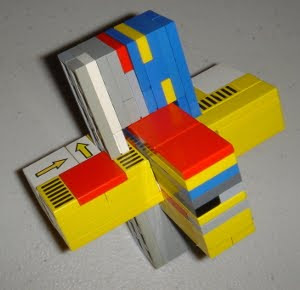
Prototype 2: changed so the tiles are on the "outside" and provide a more uniform look when the puzzle is assembled.


Prototype 2 pieces.


Comparison of the two prototypes and final "small" version in red.

Saturday, January 2, 2010

Foam Brick Mosaic

I saw the iPhone Lego App a few days ago and downloaded. It is an okay app. It lets you take a picture (or use an existing one) and create a Lego mosaic of the image. You can tap the screen to change the color scale.

I thought that I would try to recreate one of the mosaics with real Legos, and this is my first result. I took a photo of one of the large foam Lego bricks.

Next, I used the Lego app to create a mosaic.

Then, for "fun," I recreated it in the Lego Digital Designer, thinking it would help me figure out what pieces, etc. Although, I largely just used 1x1 plates in the digital version.

I used the LDD version to build the final one, using a variety of plates that would fit the mosaic. I was lazy and decided to just leave the background gray rather than filling it in with white. I also just did the main brick and shadows.

Tuesday, June 9, 2009

Sphere

Ever since I got the "The Ultimate LEGO Book," I have wanted to make a sphere like the one shown by master builders.

A few years ago I tried to make a small one but it did not turn out that well (if I can find photos of it I will try to post it sometime). A few days ago I went online to see if I could find instructions for one.

I cam up empty handed since most of the ones I found online where not as detailed or required angle plates to achieve a sphere like shape. Nothing using just "normal" plates and bricks.

Over the weekend I pulled out the book and examined the photo that was included and created my own version. After about 13 hours (over 3 days) of building it was finished.

Weighs around 4.7 pounds
32 studs across
26.33 bricks high (79 plates)


Photo of sphere from The Ultimate LEGO Book


Progress #1, bottom


Progress #1, top


Progress #2, bottom


Progress #2, top


Progress #3, bottom


Progress #3, top


The two parts, ready to be combined to form the final sphere


Finished sphere


View of the bottom


View of the side


Comparison of sphere with 2x2 brick


Comparison of sphere with a minifig

Wednesday, May 13, 2009

Koem DD

Here is a modified version of my first microbot in the digital designer.

Cost: $1.87
Part Count: 11

Wedged Cube DD

I created the wedged cube model in the digital designer. Getting it would cost $5.54. Seems a little expensive for 22 pieces. I'll have to try getting one sometime.

Click on the LEGO Factory Creations on the side to view it and the other models I have uploaded. (NOTE: not yet approved as of this posting, so this will not be listed)

Tuesday, May 12, 2009

Wedged Cube


I initially created 8 corners using some wedge plates thinking of making a large cube. I was trying to come up with a way to connect them nicely and stumbled upon the smaller cube below that uses just 4.


A closeup of the corner's "inside." The build pictures below create the cube differently since it seemed easier to construct it that way rather than trying to connect four of these corner pieces together.


All the pieces used for this model, just three types.


Two wedges and a 2x2 plate make up each side of the cube.


Place a wedge on the 2x2 plate as shown.


Put the other wedge next to the first.


Make 5 more of these for a total of 6.


Turn over three of the sides and place connector bricks as shown.


Assembly these three sides to form half of the cube.


Carefully add two more. It might be slightly tricky to get good, solid connections between the bricks. If you take your time and make adjustments it will eventually work out.


The final cube using "wedges."

Friday, May 1, 2009

Twisted Column

The twisted column was originally created as a way to organize my 1x2 jumper plates by color.


Start by placing two jumper plates side by side to make a 2x2 square.


Place another jumper plate across the studs formed by the 2x2 square.


Place two more to build up the column.


Continue placing additional plates in twos to create the column.